FOSDEM videobox
The FOSDEM video box will take care of the streaming and recording. There is no need to operate the controls on the camera (once on and in the correct video mode, which the setup team will have done). The setup team should also have connected the following:
at least one network cable
a power cable, connected to mains, with the box already turned on
HDMI out(NOT HDMI loop!) to the projectora loose HDMI cable in
HDMI in, for connecting to the presenter laptopa HDMI->USB stick in the front USB port
an HDMI cable from the camera to the HDMI->USB stick
Any order of connecting and powering on will work. No need to reboot the box after changing connections. Fully booting the box takes about a minute. The videobox display should alternate every few seconds between a status screen and a video stream screenshot.
Do not attempt to power off the box unassisted. This may damage the integrity of the system. If you suspect it may be malfunctioning and there is not enough diagnostic information, contact the control and monitoring team (see chapter “During the event” for full details). They may already be aware of the problem, but quick reporting helps cut down on reaction times.
DO NOT your own network device to the box. The videobox switch is on a vlan with reserved bandwidth for video streaming. Non-video equipment may compromise broadcast quality.
The videobox offers speakers only HDMI input. Your building’s video team might offer limited mini-DP and usb-c connectors on a best effort basis. The HDMI signal is automatically scaled to 1080p (1920×1080) at 50Hz. Matching this on the presenter laptop is a good idea, but not a requirement.
The display on the box will show all vital information about the current status of the box. It shows a snapshot of the stream video, replaced with signal and its network status (connected/disconnected), recording status (yes/no), streaming status (yes/no) and more every few seconds. The sides of the display show the audio levels of the built-in audio mixer.
The boxes report all this information to control while their network status is good, where the control and monitoring team keeps an eye on all rooms. If something is wrong, they may send somebody your way to correct it. Please follow the instructions (if any) of video team members. Keeping an eye on the box vitals and correcting any problems you notice is encouraged.
Tripod
We use the Manfrotto MVH 502. This should hopefully be self-explanatory. Please offer feedback to VOC if that is not the case.
Camera
FOSDEM 2027 uses two camera models: the Sony HXR-NX100 and the experimental c2 (“confcam”).
Standard camera settings and quick checklist
Sony |
confcam |
|
|---|---|---|
resolution |
1920×1080 |
1920x1080 |
refresh rate |
50p |
25p |
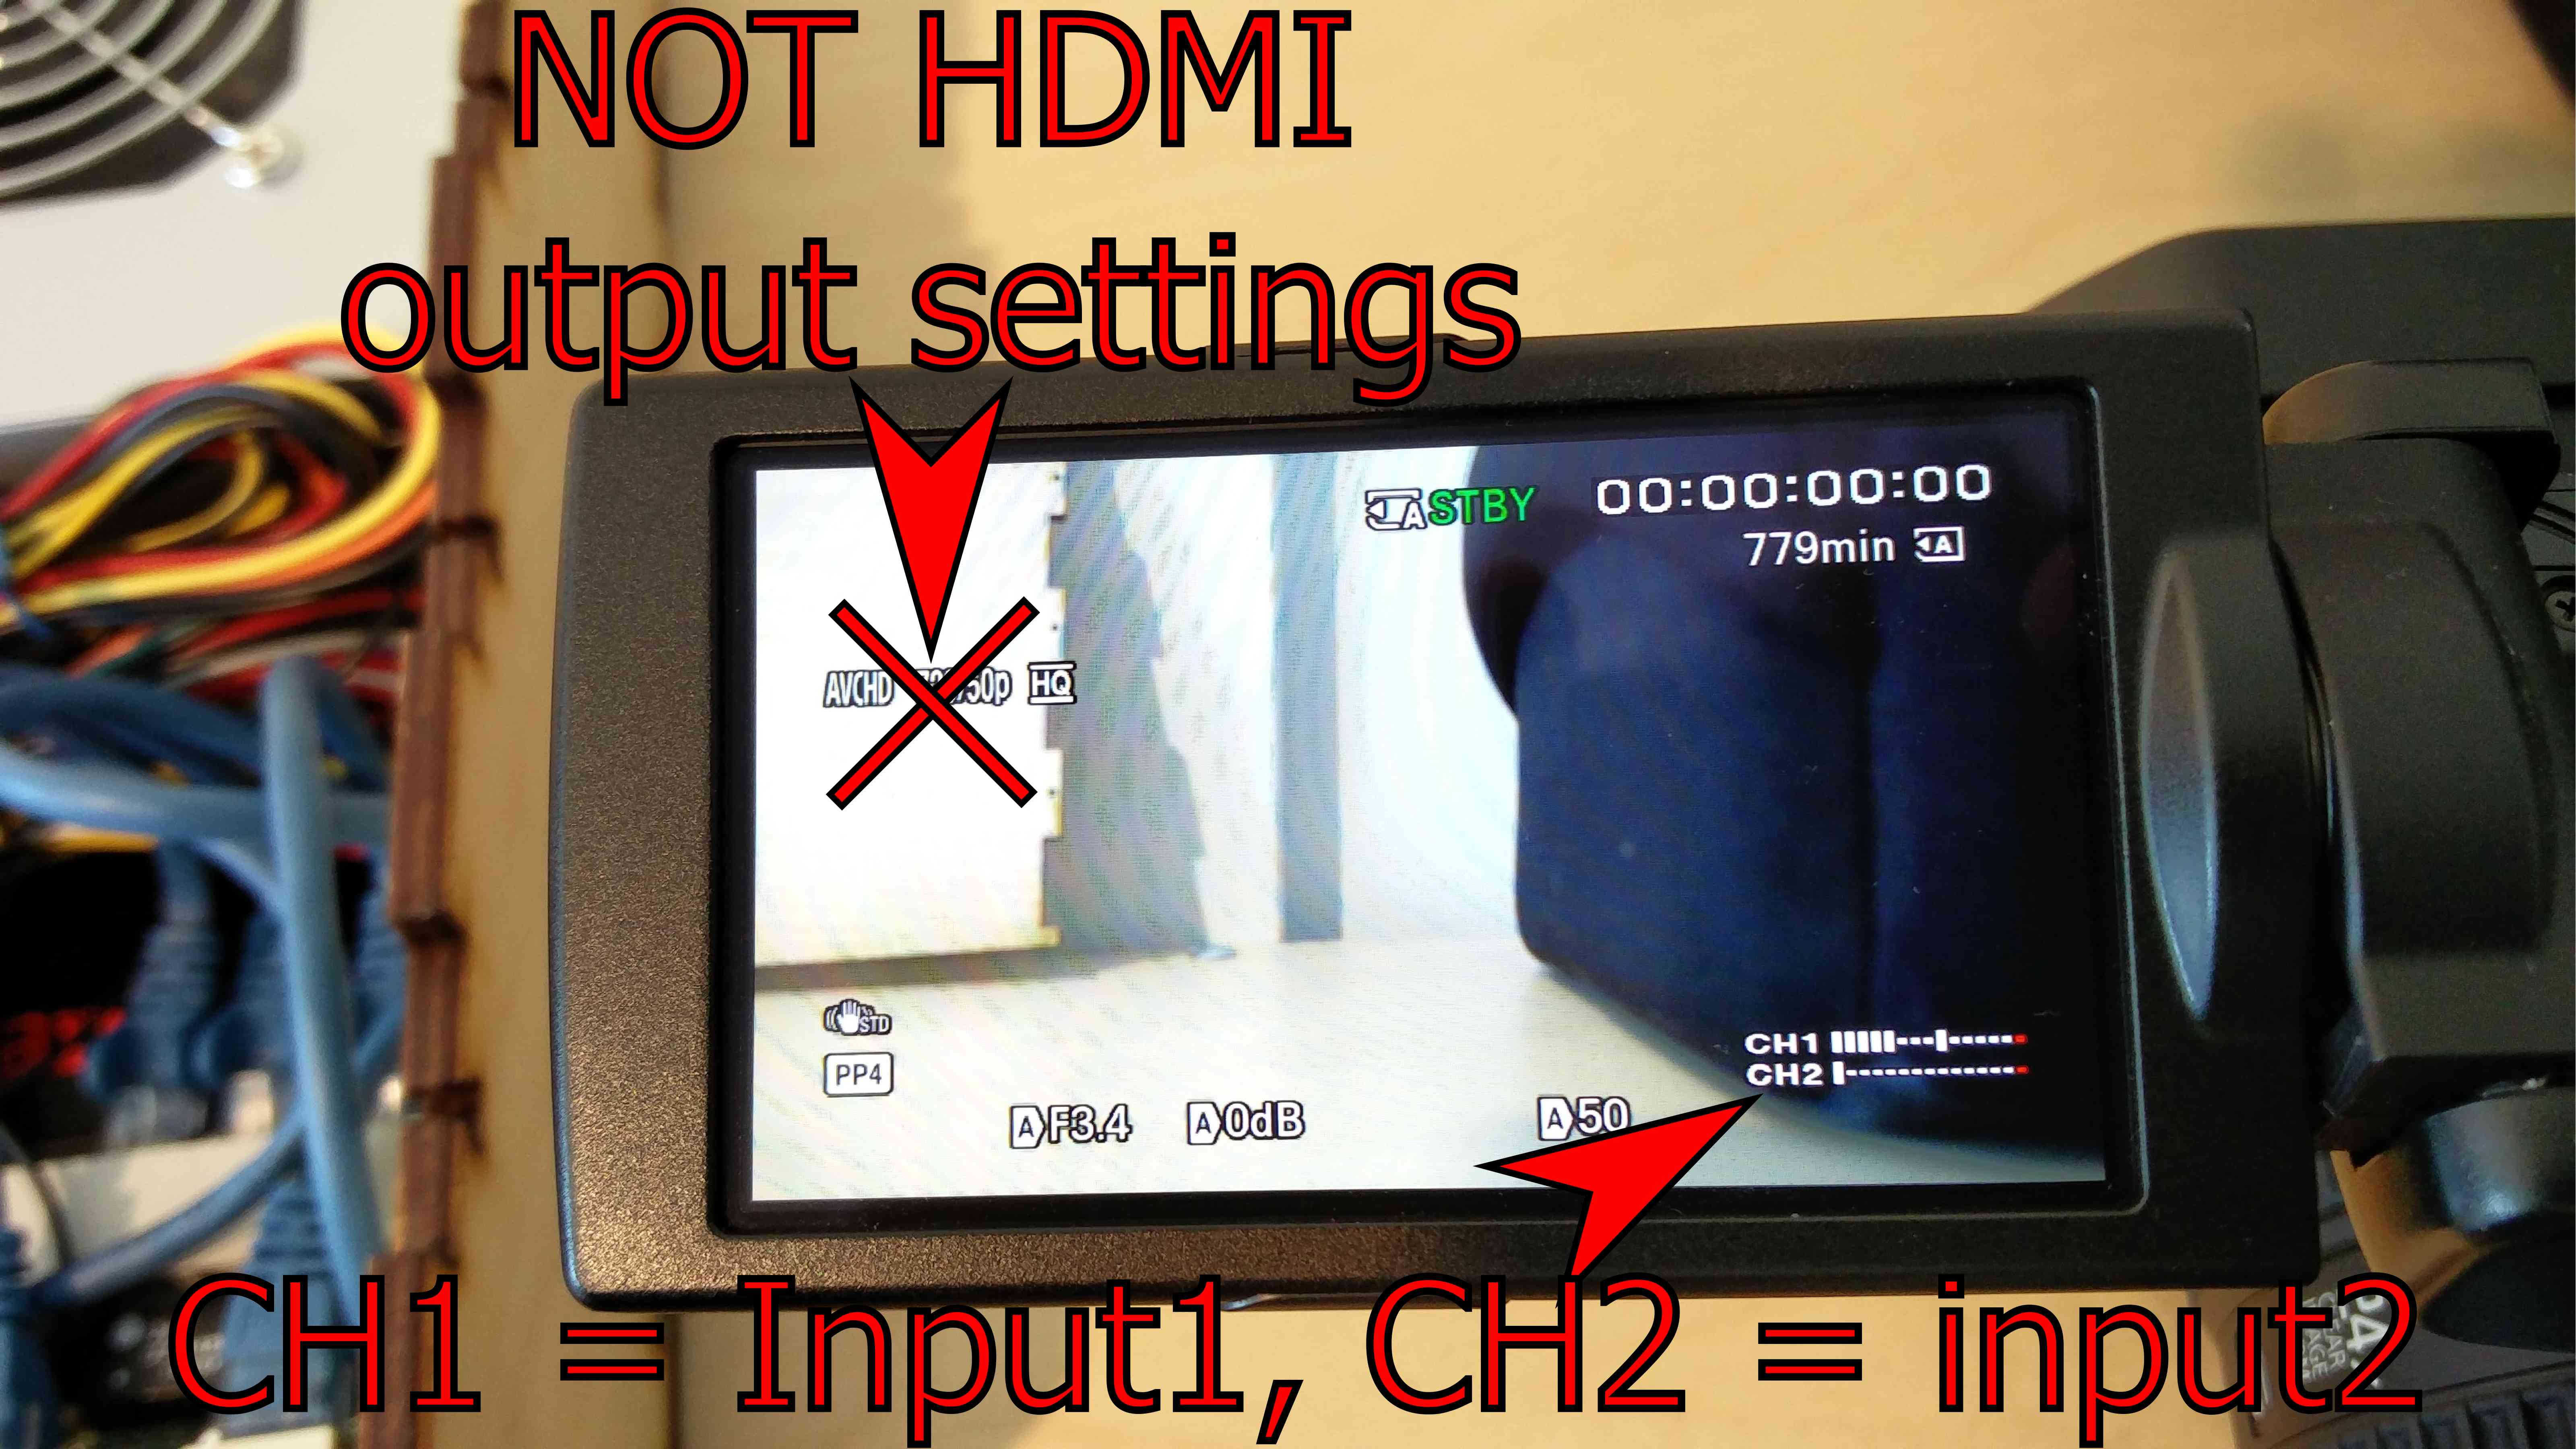
MIC-CHANNEL1 (left) |
internal microphone |
n/a |
MIC-CHANNEL2 (right) |
internal microphone |
n/a |
power source |
ac AND battery |
ac only |
lens cover |
remove! |
remove! |
camera/tripod |
tripod plate attached to cam |
tripod plate attached to cam |
Camera setup for a room
Mount camera on tripod
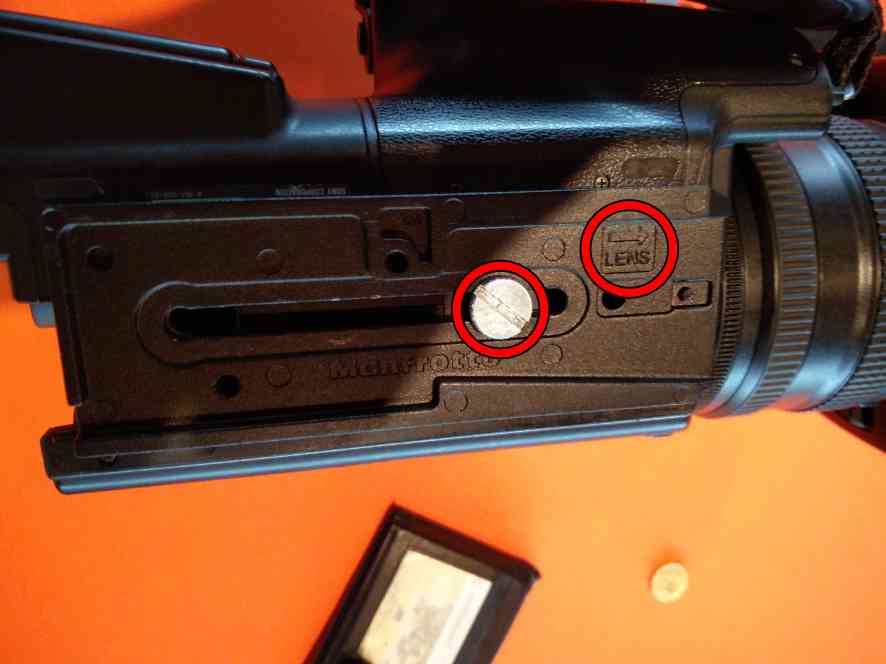
Screw the tripod plate onto the camera. Use the screw hole on the botton of the camera.
The plate has a distinct “point camera in this direction” arrow. Pay attention to this.
Tighten the screw using a 0.05€ coin or similar.
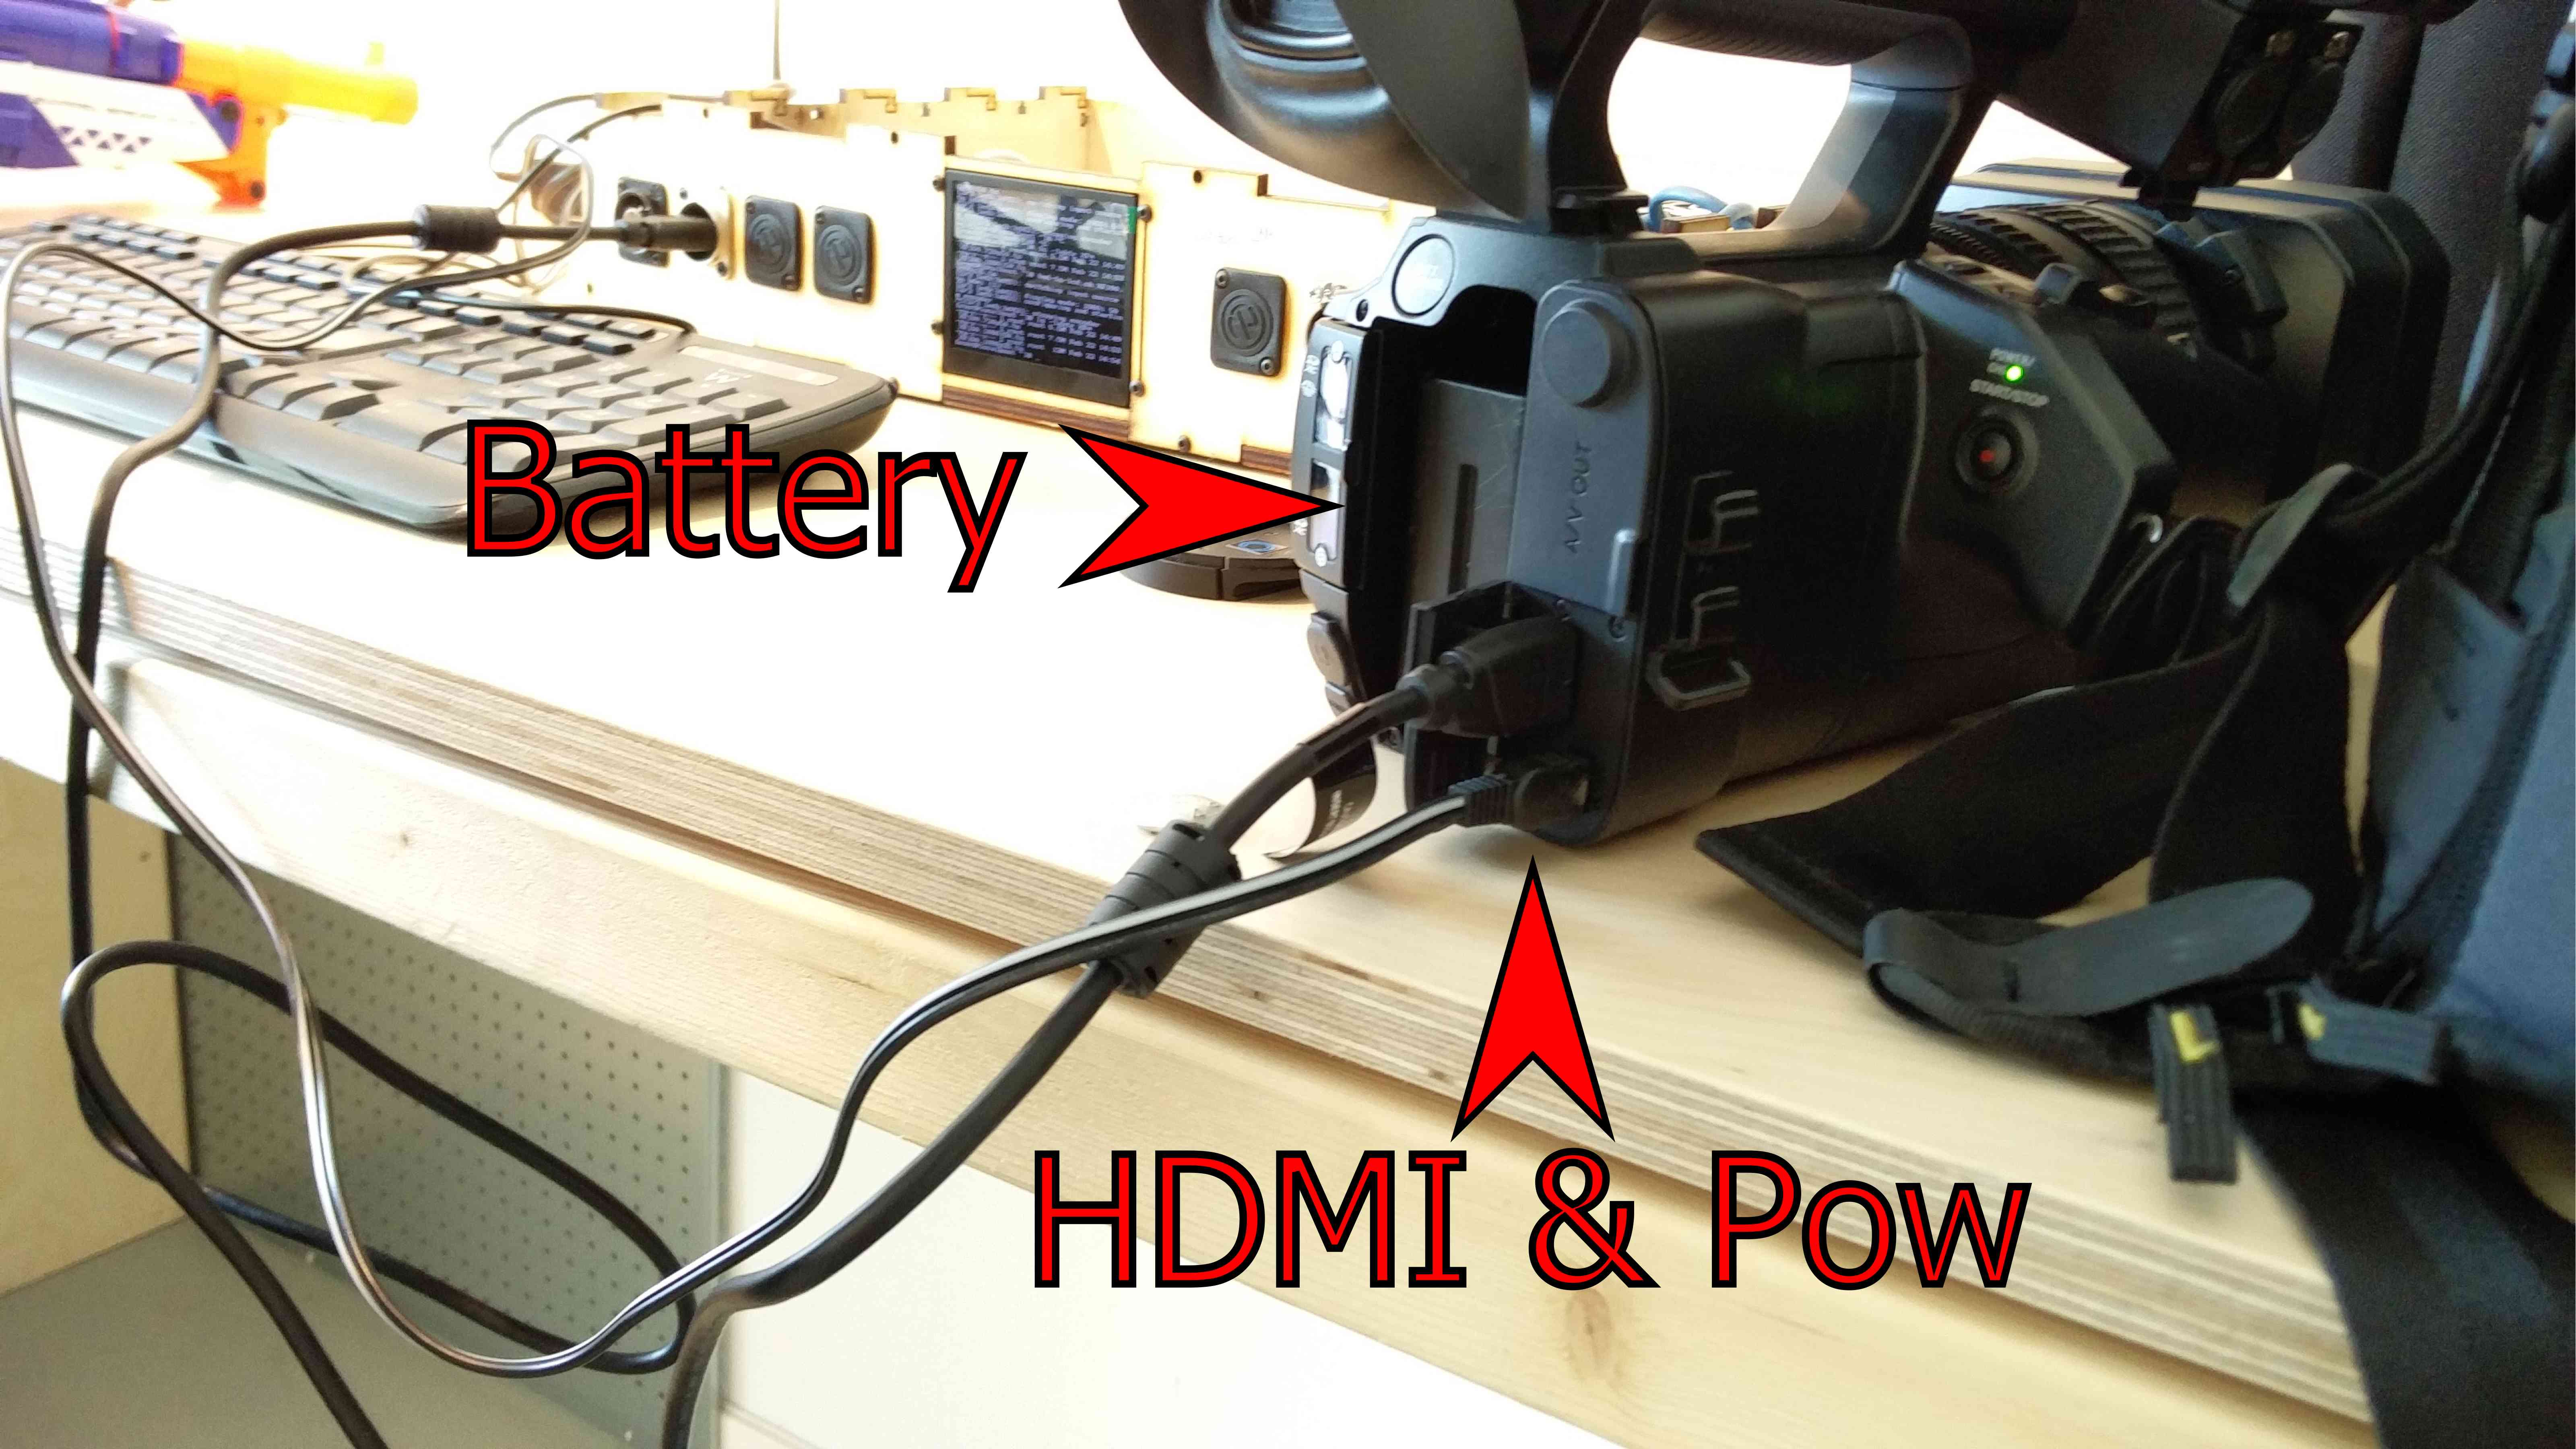
Power and HDMI connectors
Plug in battery at the back.
Plug in HDMI and power cables. Both are next to each other in the back, right of the battery slot. See photo.
Plug power cable into the mains.
Plug HDMI->USB stick into video box USB slot. Note: out of five USB slots, only the right one is connected internally. Verify LED lights up green.
Plug other side of camera HDMI cable into HDMI->USB stick.
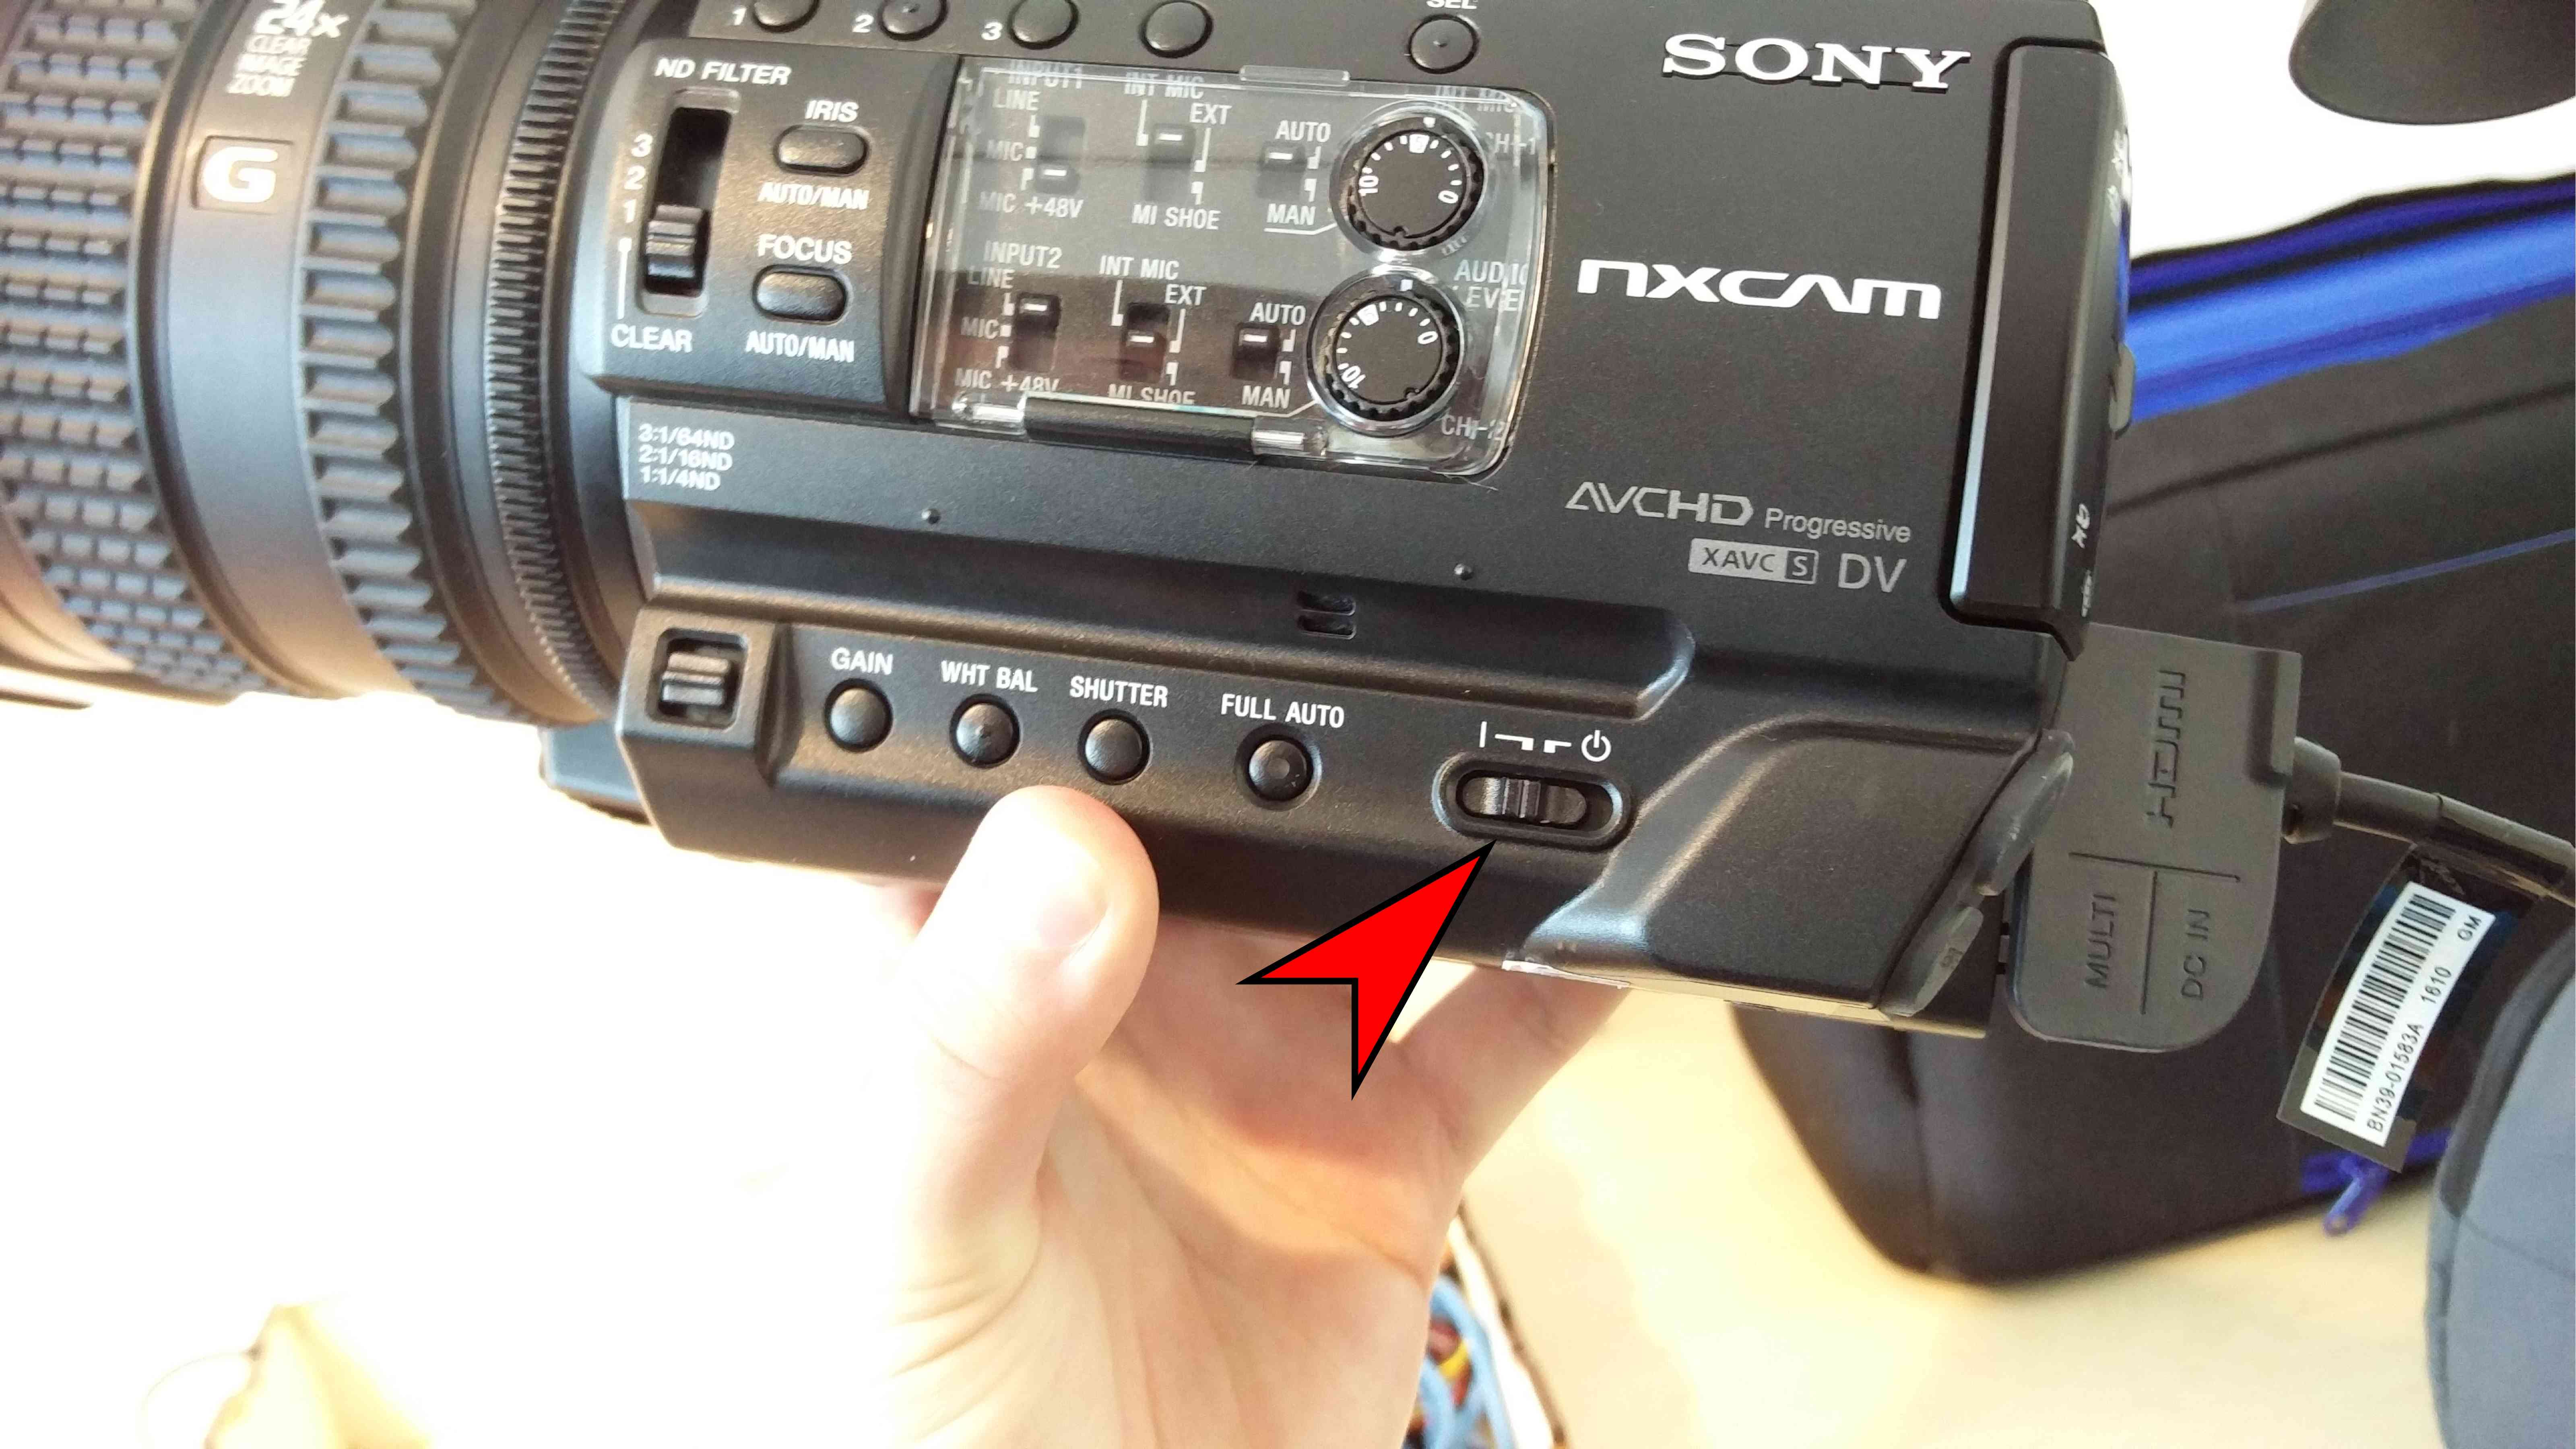
Power on
The power button is on the left side of the camera (looking from behind). Look in the bottom right corner.
Factory default settings
Does the camera ask for a time and date?
Yes? Skip this section. It already is on factory default settings.
No? Let’s restore factory default settings:
reset all but the picture profile settings to factory default:
Menu→three drawers icon→Initialize→OKset a random date/time. Clicking the SET button a few times is ok.
reset picture profile 4 (the default picture profile) to factory default:
Menu→Camera set(camera icon) →Picture profile→PP4→Setting→Reset→Yes
Audio settings
The audio settings can only be done through the hardware switches on the camera. Make sure to set the switches to the correct positions, as these directly affect the availability of audio on the recordings and live streams. Wrong settings means no audio! If unsure, verify with the image below.
Input |
Left switch |
Middle switch |
Right switch |
Dial |
|---|---|---|---|---|
Input1 |
BOTTOM (Mic 48V) |
TOP (INT MIC) |
BOTTOM (MANUAL) |
5 |
Input2 |
BOTTOM (Mic 48V) |
TOP (INT MIC) |
BOTTOM (MANUAL) |
5 |
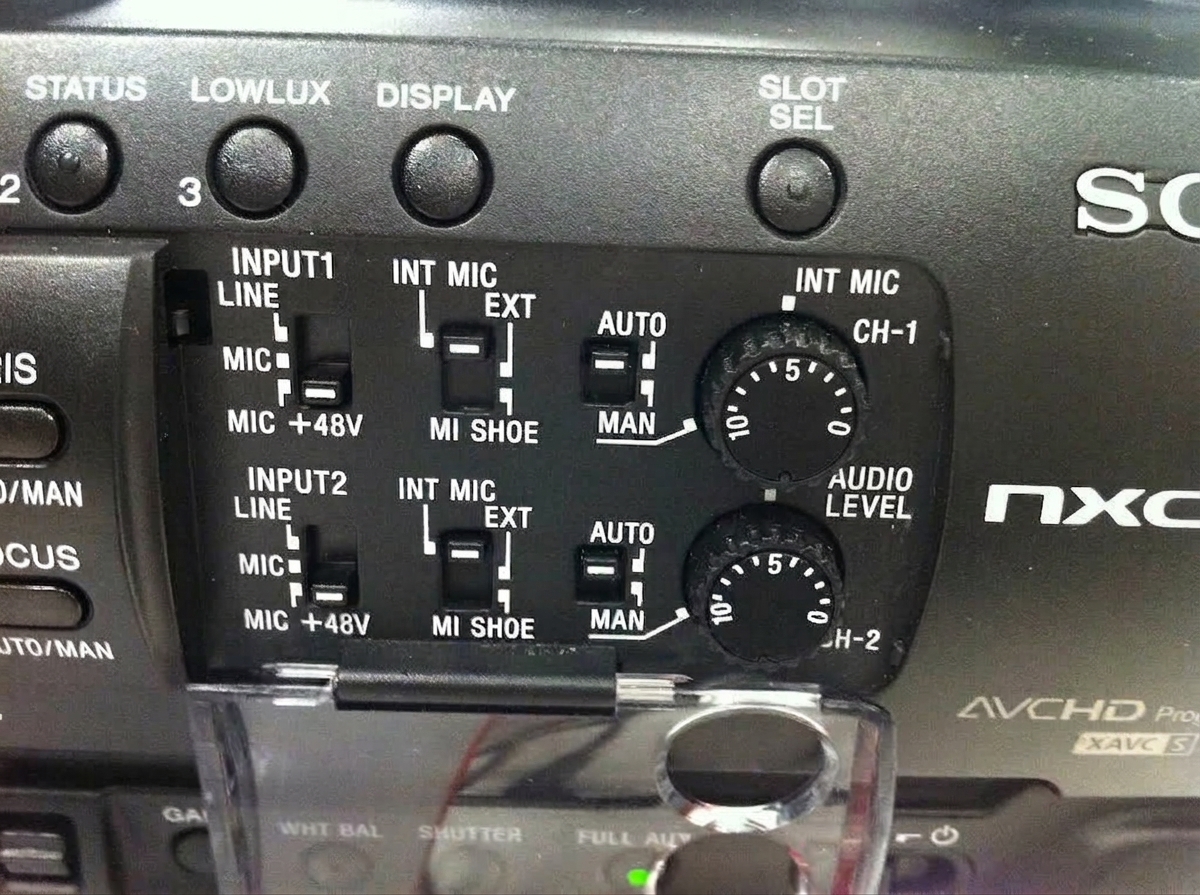
Audio levels
To configure the audio levels:
Dial both audio channels to level 5 on the camera.
Check the camera’s internal microphone. Speak loudly near the camera. Make sure the levels don’t go over the end. Adjust both dials if needed.
For all external microphones:
Yell while wearing or holding the microphone.
Make sure the levels on the videobox audio mixer don’t go red. Adjust in control.video.fosdem.org if needed.
Increase the volume inside the room. Test for feedback. Adjust accordingly.
Use the microphone close to te PA. Test for feedback. Adjust accordingly.
Camera video output configuration
Now let’s set the video configuration through the on-screen display:
Menu → 2nd icon (two arrows) → Video out → HDMI → 1080p.
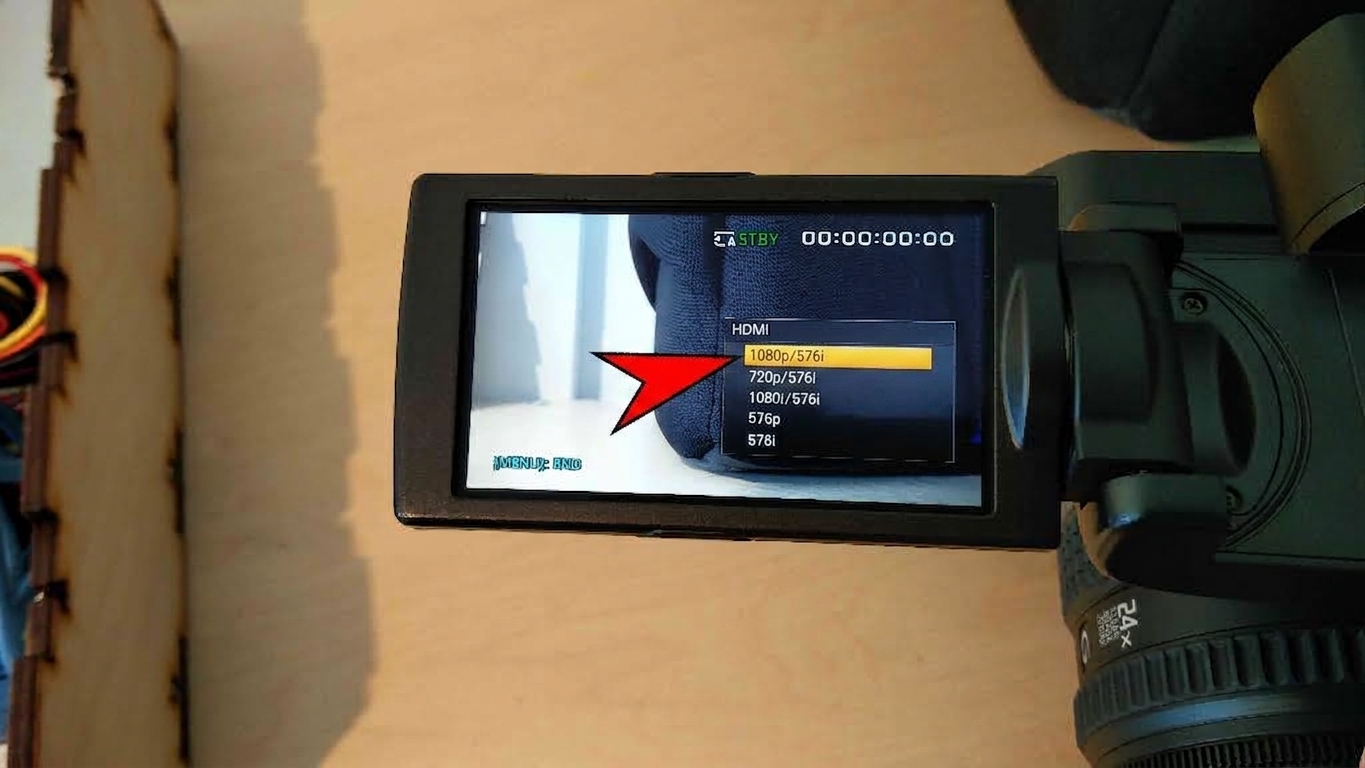
Ignore the resolution info on the OSD. It relates to SD card recording resolution. We need the HDMI output resolution. That is a completely different setting on this Sony HXR NX-100.
In rooms with low light conditions only, press button 3 (LOWLUX) to have the camera auto adapt to low light levels. A candle icon appears in the bottom right corner of the OSD screen.
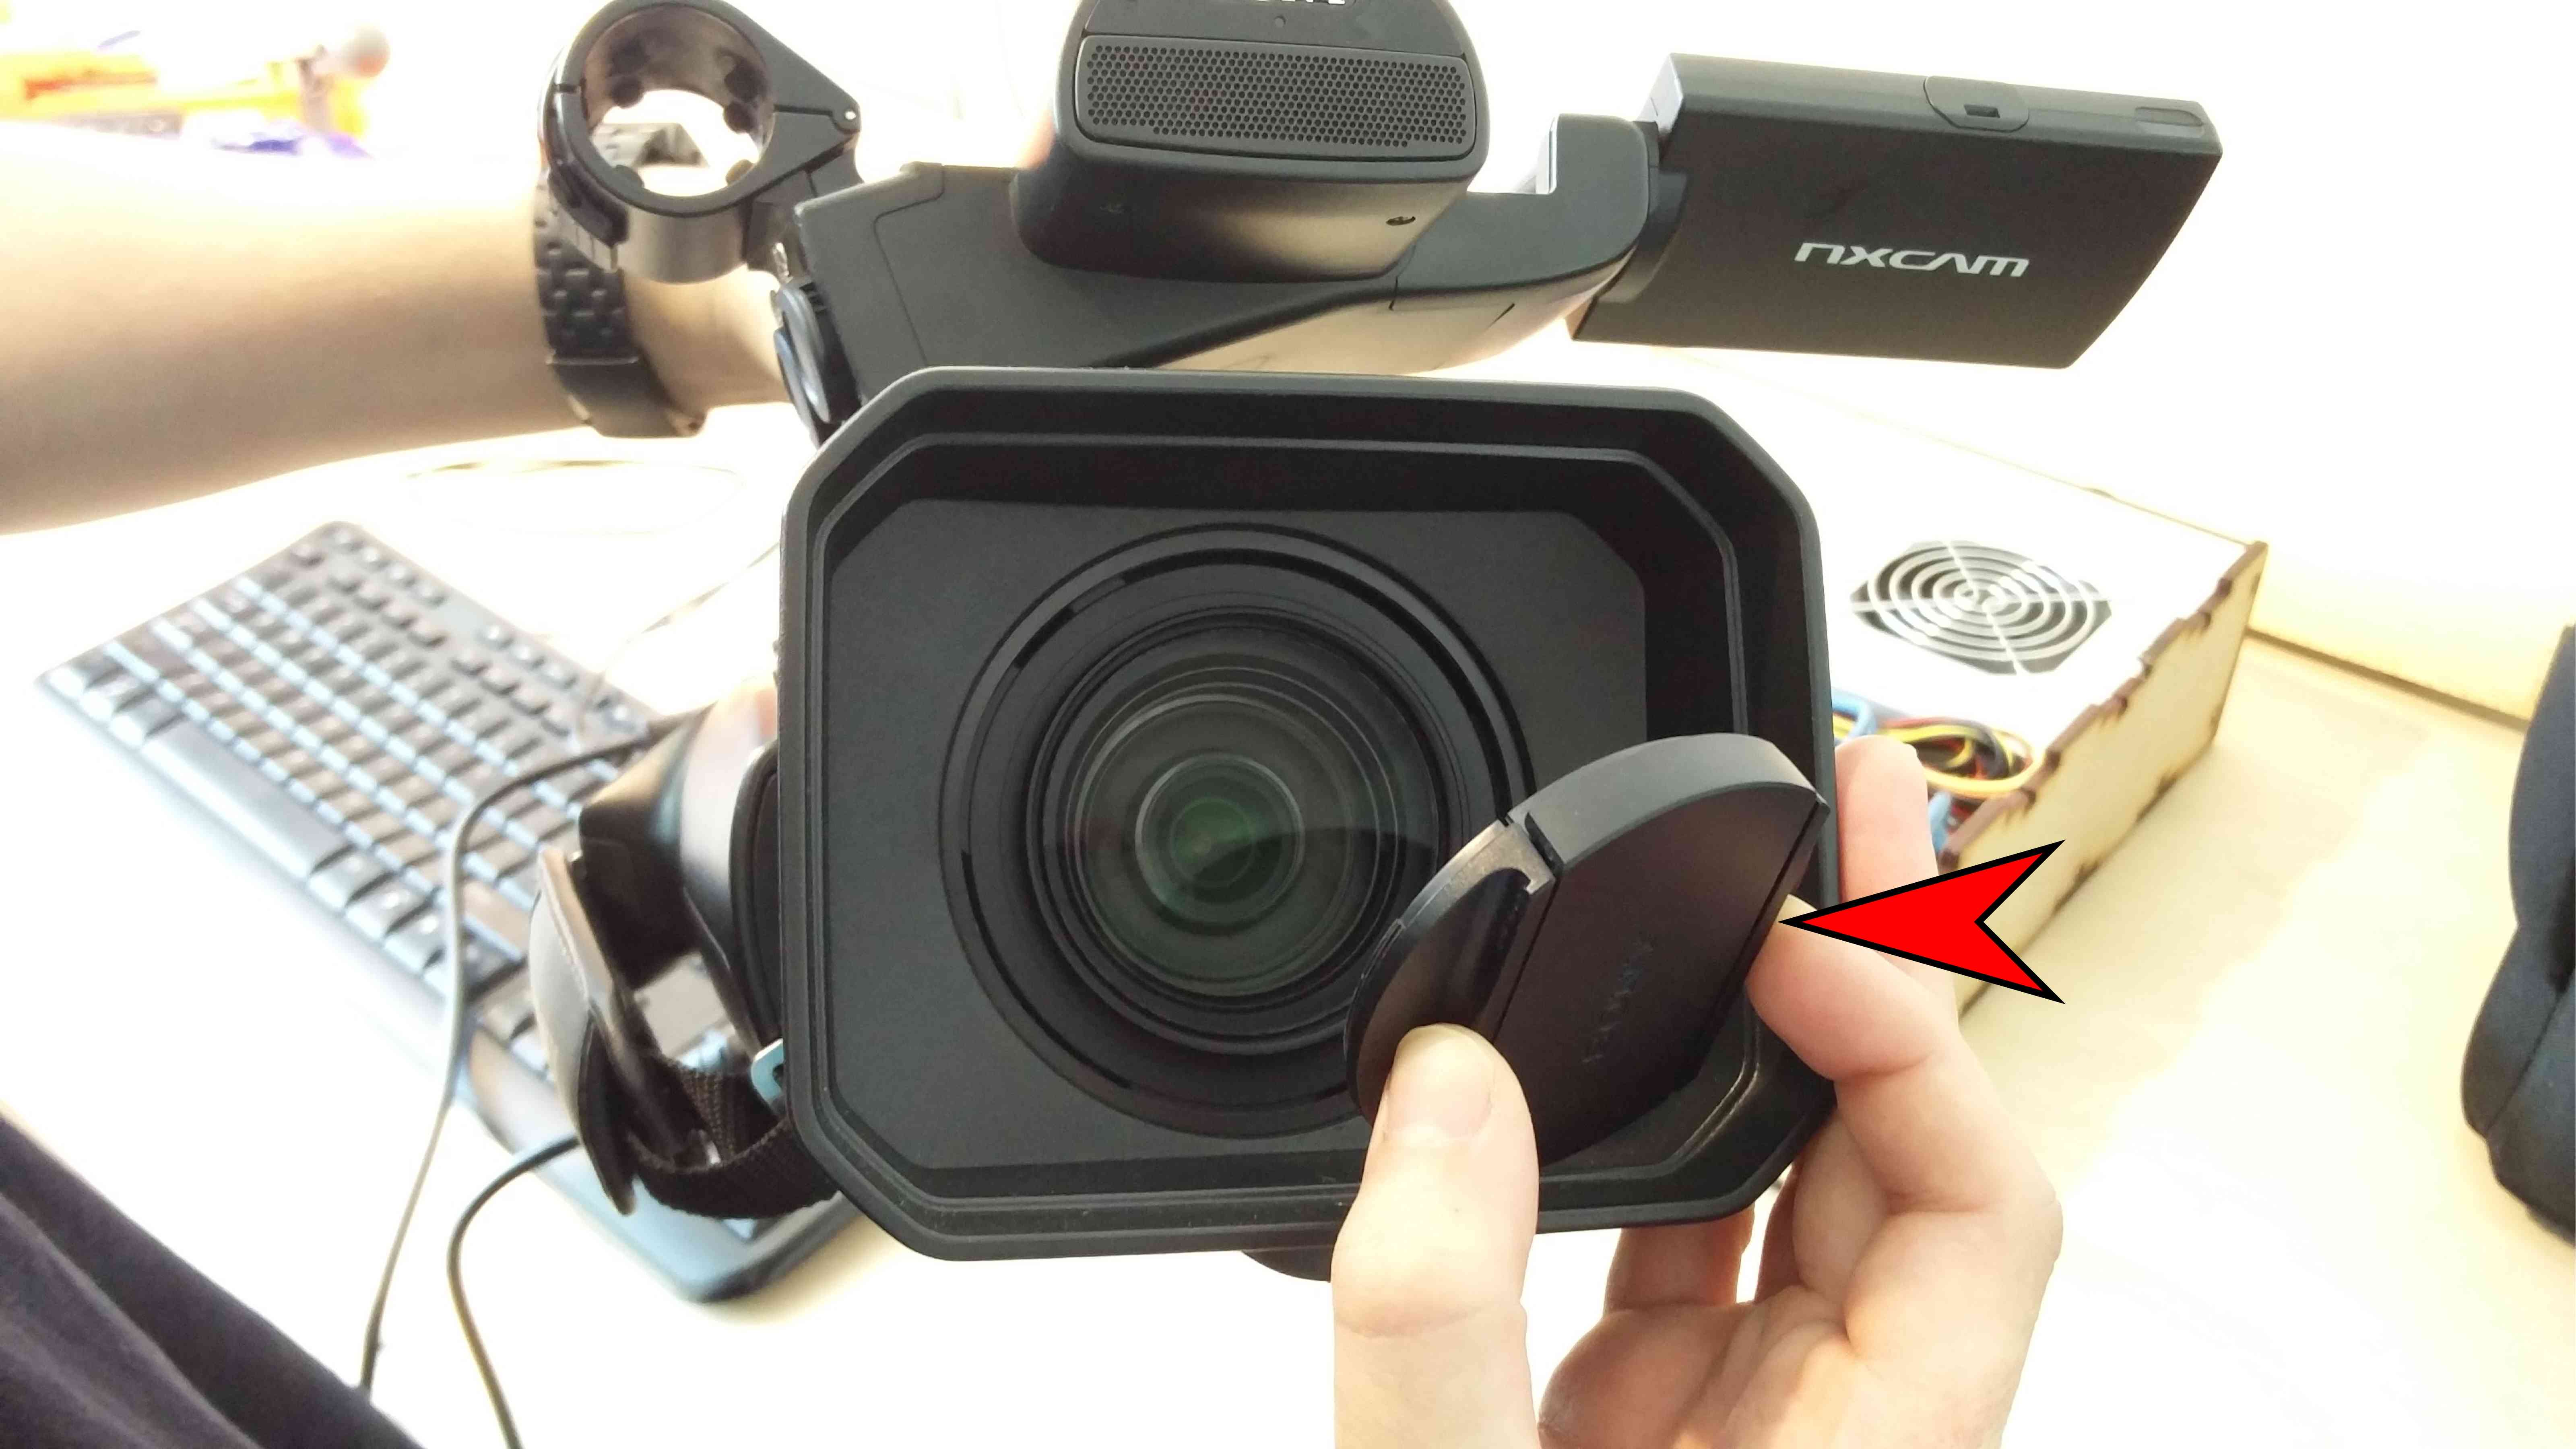
Remove the lens cover
Remember to remove the lens cover. Store it in the camera bag for safe keeping.
Checklist
Please check before leaving:
Do CH1 and CH2 on the camera display spike when you tap the camera itself with your fingers?
Is the wireless speaker microphone off? That conserves battery power for during the day.
Does the videobox display say mode 1080p50?
Does the videobox display the camera image on the LCD display?
If any of these do not work, re-check connections and settings. Still no luck? Contact VOC!
Contact control
Room setup finished? Please report to VOC for a full test. They will let you know what room needs attention next.
During the event
It is expected of the devroom video volunteers that they keep an eye on the following, in order of importance:
The wireless speaker mic is on during talks
The wireless speaker mic is worn correctly (see below)
The audio volume is not too low or too high (clipping is bad!)
The camera is aimed at the speaker, not the projection screen (the projection screen is captured separately!)
None of the video equipment is stolen or tampered with
The video boxes/laptops are turned on and have OK network status.
The main task is ensuring audio quality. Video quality, while important, is only a secondary concern. A recording without video is still usable, but a recording without audio is completely useless.
The correct way to wear a lapel mic is as follows:
The microphone is attached at speaker’s clothes near the neck, under the chin (centrally);
There are no necklaces or lanyards that would touch it during the talk;
There are no scarves or similar that cover the microphone or will touch it;
The microphone is attached to the topmost layer of clothes (so there’s nothing above it that would touch it);
If there is no place where the microphone can be attached, a lanyard can be used for this purpose, on top of all the clothing of the speaker;
The microphone receiver is attached to the belt of the speaker. If not possible, it’s attached on top of a pocket;
If the speaker has neither a belt nor pockets, he/she can hold the receiver in hand, or worst case scenario, it can be attached with duct tape to the waist (with a full loop around the waist) (this is a joke, do not duct-tape speakers)
The speaker is notified that if he’s not facing in the direction of the microphone (e.g. not looking straight) the audio will be less audible.
Video team members will be both monitoring remotely as well as visiting rooms with problems. If you have questions, concerns or problems and there is no
video team member nearby, contact them in FOSDEM Video. If your video box shows issues on the LCD, most likely somebody is already on their way to you.
When communicating with video team members, please mention the room number as opposed to the devroom name. Devrooms move around, room numbers stay constant.
System infrastructure overview
#figure( rotate(-90deg, reflow: true, image(“../../graph/overview.pdf”, width: 200mm)), )
Above is a general schema of the setup.
This section explains how the video streaming and recording works in general for FOSDEM, to use as a helper to understanding the system and dealing with issues.
The system’s code and recipes for deployment are available at https://git.fosdem.org/video . in the ansible subdirectory.
Below is a list of components (some software, some whole-system) that are the pieces of the whole thing.
video-box
The videobox is a capture device that provides sproxy interface from its video and audio capture, plus some monitoring functions.
In the box you can find:
HDMI capture device, based on the MacroSilicon MS2131 chip. The two HDMI ports on the box are connected to it;
a 5-port Ethernet switch;
a 5-port audio mixer with 2 XLR outputs and 3 XLR inputs, all for line level;
a power-board that handles powering all the components and provides 4 × USB-A power ports at 250 mW and one USB-A port that should be pass-through to the control board;
a Radxa X4 board, which controls everything (a normal x86_64 single-board computer);
a three-section display;
video mixing
Implemented in fazantix.
Fazantix fetches the streams for the camera and presenter from a room, and provides the “finished” video stream to the streaming and recording infrastructure. The finished stream is again presented via sproxy.
There are three sources for fazantix:
cam, fetched from the HDMI usb stick on the videobox;slides, fetched from HDMI in on the videobox;backgroundthat contains artwork/the year. Remind us to update this for the current edition please.
The input streams are mixed into a 1080p 25gps SAR/DAR 1:1 h264/aac MPEG-TS stream and thrown at ansproxy instance.
The fazantix web ui can controls the audio mixer and switch the views/mixes of the stream:
full-screen camera;
full-screen presentation;
mix: large top-left presentation, small camera bottom right (the default);
mix, large top-left camera, small presentation bottom right;
video-control-server
Partially implemented in role video-control-server. Partially, because some
of the stuff gets tweaked and updated on the running node before and during
FOSDEM.
The following tasks are handled by the control server:
a database (with interface) of the room/videobox/(optional) confcam mappings. This is queried from the streambackend to know where to get the data for a particular room;
a Grafana instance to plot the sound levels;
a preview page with all rooms (selectable by building) showing camera/slides/mix and sound levels for every room (
showbuilding.php);a control interface for every room for changing the current video mix, controlling the audio mixers and room status. It’s authenticated with users/passwords provided to devroom managers and VOC people;
DHCP and DNS server for the video VLAN.
For every room, the control server fetches jpeg frames from fazantix: slides, cam and mixthe voctops.
video-audio-parser
Implemented in role video-audio-parser.
The following tasks are handled by the video-audio-parser:
An InfluxDB database with sound levels for voctops and audio mixers (called
ebur2)Instances of
audiofetcherthat fetch data from the voctops to plot sound levels;
video-streambackend
Implemented in the role video-streambackend.
This is a (currently) single physical server outside of ULB that fetches all mixed video streams from the voctops, and creates:
A HLS stream with two video (selectable) streams for viewing by end users;
20-minute dumps of video streams, to be processed by
SReview
These are both created by using ffmpeg. The HLS stream is served via nginx
to the streamfrontends, and the dumps are served via either ssh/sshfs or
NFS to sreview.
video-streamfrontend
Implemented in the role video-streamfrontend.
This is a somewhat simple caching proxy implemented with nginx that presents
the video streams from the streambackend to end users.
video-streamdump
The streamdump’s role is to connect to all video-boxes and all voctops, to
fetch the video they provide to record it to be used for restore for
emergencies. There is usually one at ULB and one externally.
HLS player
web0’s role is to host the HLS player (implemented in JavaScript) that
end-users load to play the HLS stream with. It shows the video stream for the
relevant room and allows for selecting the video quality that the users want to
see.
Historical notes
Things done in the past that we moved away from:
mod_nginx_rtmp
The module is nice, but has serious limitations on multi-audio/video stream processing, strange failures, and at some point didn’t have any updates or support. It was used to push from the voctops to the streambackend. After its removal, all video transfers became pull-based.
multicast
Sending MPEG-TS over UDP over multicast saved bandwidth due to the multiple
consumers of every stream. But packet loss in MPEG-TS was leading to subtle
issues in ffmpeg’s parsing and processing and needing the restart of streams
for issues that were hard to catch.
Experiments were done with flow control (didn’t help) and reliable multicast
(the libraries didn’t work, or at least Vasil was unable to make them), but
nothing came out of that, so sproxy was born.